[Vue] 使用Swiper製作燈條效果

介紹如何在Vite+Vue的環境下使用Swiper
參考資料
- 切版班每日任務Codepen | Codepen Practice
- How to make Swiper slides autoplay continuously on React, NextJs instead of playing with pause? | stackoverflow
- 在 Vue 中使用 Swiper Element (WebComponent) | IT邦
- How to set compilerOptions.isCustomElement for VueJS 3 in Laravel project | stackoverflow
相關連結
- Vue與WebComponents--Vite範例配置 | Official
- Swiper Core/API--Modules | Official
- Swiper Element--Usage with Vue | Official
- Swiper Element--Injecting Style | Official
- Swiper Vue Component | Official
- Swiper Demo--Autoplay(with Swiper Element) | Official Sandbox
- Vue API--app.config.compilerOptions | Official
簡單範例
在切版的時候,因為需要實作一個跑馬燈的螢光條,所以選用了Swiper搭配Autoplay,並且設定delay為0的方式來實現。因為這次使用的是Vite+Vue,所以稍微遇到一些問題。在本篇紀錄一下供日後查找。
Swiper Vue.js Component
<template>
  <swiper :modules="modules" :slides-per-view="1" :space-between="0" :loop="true" :autoplay="{delay:0}" :speed="1000" :allow-touch-move="false"
  >
    <swiper-slide class=" from-primary-linearlight to-primary-lineardark w-full bg-gradient-to-r to-80%"></swiper-slide>
    <swiper-slide class=" from-primary-lineardark to-primary-linearlight w-full bg-gradient-to-r from-20%"></swiper-slide>
  </swiper>
</template>
<script>
// import Swiper core and required modules
import { Autoplay } from 'swiper/modules'

// Import Swiper Vue.js components
import { Swiper, SwiperSlide } from 'swiper/vue';

// Import Swiper styles
import 'swiper/css';

// Import Swiper styles
export default {
  components: {
    Swiper,
    SwiperSlide,
  },
  setup() {
    // const onSwiper = (swiper) => {
    //   console.log(swiper);
    // };
    // const onSlideChange = () => {
    //   console.log('slide change');
    // };
    return {
      // onSwiper,
      // onSlideChange,
      modules: [Autoplay],
    };
  },
};
</script>
<style>
.swiper-wrapper {
    transition-timing-function: linear !important;
}
</style>
Swiper Element
<template>
  <!-- <swiper-container init="false" class="swiper-wrapper" :slides-per-view="1" :centered-slides="true" loop="true" allowTouchMove="false" autoplay-delay="0" speed="1000" allow-touch-move="false" ref="swiperInstance"> -->
  <swiper-container init="false" class="swiper-wrapper" :slides-per-view="1" :centered-slides="true" loop="true"  ref="swiperInstance">
    <swiper-slide class=" from-primary-linearlight to-primary-lineardark w-full bg-gradient-to-r to-80%"></swiper-slide>
    <swiper-slide
      class=" from-primary-lineardark to-primary-linearlight w-full bg-gradient-to-r from-20%"></swiper-slide>
    <swiper-slide class=" from-primary-linearlight to-primary-lineardark w-full bg-gradient-to-r to-80%"></swiper-slide>
    <swiper-slide
      class=" from-primary-lineardark to-primary-linearlight w-full bg-gradient-to-r from-20%"></swiper-slide>
  </swiper-container>
</template>

<script setup>
import { onMounted, ref } from 'vue';

import { register } from 'swiper/element';
// import { Autoplay } from 'swiper/modules';

register();


const swiperInstance = ref(null)
const params = {
  autoplay:{
    delay:0
  },
  speed:'500',
  allowTouchMove:false,
  injectStyles: [
    `
      .swiper-wrapper {
          transition-timing-function: linear !important;
      }
    `,
  ],
};

onMounted(()=>{
  Object.assign(swiperInstance.value, params);
  // console.log(swiperInstance);
  swiperInstance.value.initialize();
})

</script>
問題點
SwiperVue元件支援度
根據Swiper官網所寫的,未來有可能不會繼續支援。
Swiper Vue components will likely to be removed in future versions. It is recommended to migrate to Swiper Element instead. If you are upgrading from Swiper 9 to Swiper 10, check out Migration Guide to Swiper 10 If you are looking for v9 docs, they are here v9.swiperjs.com
所以雖然上方程式碼有寫一版Vue Component,但是不建議繼續使用。
因為官方建議改用Swiper Element,所以接著就衍生以下其他問題。
[Vue warn] Failed to resolve component
撰寫 Swiper element的時候,因為會透過執行register()的方式來匯入兩個元件:
<template>
  <swiper-container init="false" class="swiper-wrapper" :slides-per-view="1" :centered-slides="true" loop="true"  speed="1000" ref="swiperInstance">
    <swiper-slide class=" from-primary-linearlight to-primary-lineardark w-full bg-gradient-to-r to-80%"></swiper-slide>
    <swiper-slide class=" from-primary-lineardark to-primary-linearlight w-full bg-gradient-to-r from-20%"></swiper-slide>
  </swiper-container>
</template>
<script setup>
import { register } from 'swiper/element';
register();
const swiperInstance = ref(null)
const params = {
  ...
};
onMounted(()=>{
  Object.assign(swiperInstance.value, params);
  swiperInstance.value.initialize();
})
</script>
這時候Vue沒有辦法正確判讀這兩個元件是否為客制元件。所以會跳出錯誤
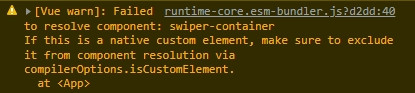
需要手動加入一些設定。這邊我參考了以下兩篇文章,在vite.config.js內加入以下設定就可以消除警告了:
import { fileURLToPath, URL } from 'node:url'

import { defineConfig } from 'vite'
import vue from '@vitejs/plugin-vue'

import tailwind from 'tailwindcss'
import autoprefixer from 'autoprefixer'

export default defineConfig({
  css: {
    postcss: {
      plugins: [tailwind(), autoprefixer()]
    }
  },
  plugins: [
    vue({
      template: {
        compilerOptions: {
          isCustomElement: (tag) => tag.startsWith('swiper-')
        }
      }
    })
  ],
})
參考資料:
- 在 Vue 中使用 Swiper Element (WebComponent) | IT邦
- How to set compilerOptions.isCustomElement for VueJS 3 in Laravel project | stackoverflow
- Vue與WebComponents--Vite範例配置 | Official
- Vue API--app.config.compilerOptions | Official

Safari issue
透過Element完成螢光條的效果時,發現在safari會有一個問題:autoplay會在跑過幾輪之後自動回到第一張slide並且不會再自動滾動!
查過github issue跟stackoverflow都沒有有效的解決方法。而且停止的時間點會跟delay所設定的間隔有關。即delay設定成0的時候跑完所有的slide element之後就會馬上暫停;delay設定成100的時候可能會再多跑一輪。(整個黑人問號.jpg)
所以這邊改用core api撰寫該元件。
<template>
  <div class="swiper" ref="swiper">
    <div class="swiper-wrapper">
      <!-- Slides -->
      <div class="swiper-slide  from-primary-linearlight to-primary-lineardark w-full bg-gradient-to-r to-80%"></div>
      <div class="swiper-slide   from-primary-lineardark to-primary-linearlight w-full bg-gradient-to-r from-20%"></div>
      <div class="swiper-slide  from-primary-linearlight to-primary-lineardark w-full bg-gradient-to-r to-80%"></div>
      <div class="swiper-slide   from-primary-lineardark to-primary-linearlight w-full bg-gradient-to-r from-20%"></div>
      <div class="swiper-slide  from-primary-linearlight to-primary-lineardark w-full bg-gradient-to-r to-80%"></div>
      <div class="swiper-slide   from-primary-lineardark to-primary-linearlight w-full bg-gradient-to-r from-20%"></div>
    </div>
  </div>
</template>
<script>
import Swiper from 'swiper';
import 'swiper/css';
export default {
  data() {
    return {
      swiper:''
    };
  },
  mounted(){
    new Swiper(this.$refs.swiper, {
      // Optional parameters
      // direction: 'vertical',
      spaceBetween: 0,
      centeredSlides: false,
      autoplay: {
        delay: 0,
        disableOnInteraction: false,
      },
      loop: true,
      speed:1000,
      slidesPerView:1
    });
  }
};
</script>
<style scoped>
.swiper-wrapper {
    transition-timing-function: linear !important;
}
</style>
Swiper Element
創建階段
在使用Swiper Element的時候,安裝可以透過 CDN 或是 NPM 來安裝。因為我們已經有使用 Vite 環境了所以這邊選擇透過 NPM 來安裝。
$ npm install swiper
接著我們創建一隻Vue SFC檔案
import { register } from 'swiper/element/bundle';
register();
到這個步驟之後我們就可以在template內使用<swiper-container>以及<swiper-slide>兩個元件了。
官方範例提供如下:
<template>
  <swiper-container
    :slides-per-view="3"
    :space-between="spaceBetween"
    :centered-slides="true"
    :pagination="{
      hideOnClick: true
    }"
    :breakpoints="{
      768: {
        slidesPerView: 3,
      },
    }"
    @swiperprogress="onProgress"
    @swiperslidechange="onSlideChange"
  >
    <swiper-slide>Slide 1</swiper-slide>
    <swiper-slide>Slide 2</swiper-slide>
    <swiper-slide>Slide 3</swiper-slide>
  </swiper-container>
</template>

<script>
  import { register } from 'swiper/element/bundle';

  register();

  export default function () {
    setup() {
      const spaceBetween = 10;
      const onProgress = (e) => {
        const [swiper, progress] = e.detail;
        console.log(progress)
      };

      const onSlideChange = (e) => {
        console.log('slide changed')
      }

      return {
        spaceBetween,
        onProgress,
        onSlideChange,
      };
    }
  }
</script>
官方範例中,export default並不需要再額外使用function。所以我們需要將function()移除。
內容建立
因為我們的目的是撰寫動態的漸層間隔線,所以我們創建了兩個swiper-slide,並且分別給他從深到淺以及從淺到深的兩個bar。
並且我們設定loop="true"代表可以無限循環、slides-per-view="1"代表一次只顯示一個<swiper-slide>元件
<template>
  <swiper-container init="false" class="swiper-wrapper" :slides-per-view="1" :centered-slides="true" loop="true" ref="swiperInstance">
    <swiper-slide class=" from-primary-linearlight to-primary-lineardark w-full bg-gradient-to-r to-80%"></swiper-slide>
    <swiper-slide class=" from-primary-lineardark to-primary-linearlight w-full bg-gradient-to-r from-20%"></swiper-slide>
  </swiper-container>
</template>
參數設定
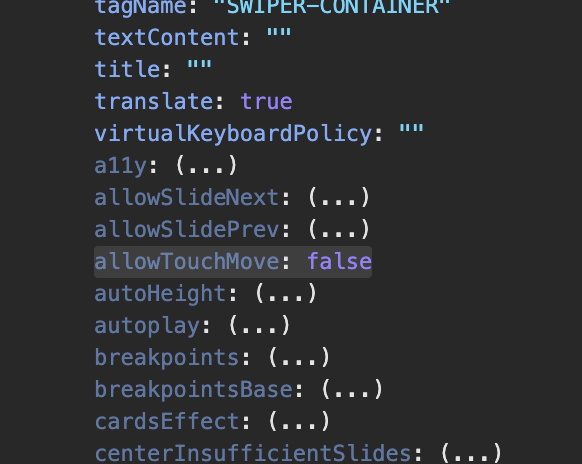
這部分花了很多時間才比較清楚怎麼使用。建議如果有找不到的參數設定,可以透過以下兩種方式來查找。
- 開啟官方所提供的Demo Sandbox
- 直接將Swiper Instance給印出來,去觀察裡面的屬性。
Demo查找屬性方法
官方在提供Demo的時候即提供了多個Sandbox,可以根據希望使用的環境來觀察官方所提供的屬性以及設定方式。
e.g:如果想要使用autoplay的功能,並且是使用swiper element來匯入使用的話,可以在Swiper Demo--Autoplay 點選Element的Sandbox。
接著可以觀察到官方範例中,在<swiper-container>內撰寫autoplay-delay="2500" autoplay-disable-on-interaction="false"的屬性。
屬性查找法
<template>
  <swiper-container init="false" ref="swiperInstance">
  </swiper-container>
</template>
<script setup>
  import { onMounted, ref } from 'vue';
  import { register } from 'swiper/element';
  register()
  const swiperInstance = ref(null)

  onMounted(()=>{
    Object.assign(swiperInstance.value, params);
    console.log(swiperInstance);
    swiperInstance.value.initialize();
  })
</script>
接著就可以透過觀察value下的屬性,在參數內設置該屬性的值。
修改官方所提供的範例並使用Composition的方式來撰寫設定如下:
<template>
  // 1
  <swiper-container init="false" class="swiper-wrapper" :slides-per-view="1" :centered-slides="true" loop="true"  ref="swiperInstance">
    <swiper-slide class=" from-primary-linearlight to-primary-lineardark w-full bg-gradient-to-r to-80%"></swiper-slide>
    <swiper-slide
      class=" from-primary-lineardark to-primary-linearlight w-full bg-gradient-to-r from-20%"></swiper-slide>
    <swiper-slide class=" from-primary-linearlight to-primary-lineardark w-full bg-gradient-to-r to-80%"></swiper-slide>
    <swiper-slide
      class=" from-primary-lineardark to-primary-linearlight w-full bg-gradient-to-r from-20%"></swiper-slide>
  </swiper-container>
</template>

<script setup>
import { onMounted, ref } from 'vue';
import { register } from 'swiper/element';
register();

// 2
const swiperInstance = ref(null)

// 3
const params = {
  autoplay:{
    delay:0
  },
  speed:'1000',
  allowTouchMove:false,
  injectStyles: [
    `
      .swiper-wrapper {
          transition-timing-function: linear !important;
      }
    `,
  ],
};

// 4
onMounted(()=>{
  Object.assign(swiperInstance.value, params);
  swiperInstance.value.initialize();
})
</script>
1. init屬性
根據官方文件,我們需要先在<swiper-container>增加init="false"。並且在完成assign之後才執行初始化。
2. 提取實例
在官方文件中,是使用document.querySelector的方式指定DOM元素。我們使用Composition API的ref方式來取得該實例。
3. 設定
接著在參數設定的物件(params)內,設定我們所需要的參數。屬性名稱可以參考上方TIP所提供的方式2來查詢。
4. 初始化
接著我們可以直接在Mounted生命週期內,先將參數透過assign的方式給增加到實例內。再將該實例給初始化使用。
- 使用ref提取
<swiper-container>的Instance時,必須要在已經掛載後,所以要在onMounted才可以初始化。 - 並且因為是透過ref來取得元素,所以要透過
.value才可以正確取得內容(assign的時候也是需要指定到instance.value內)
其他補充
另一種參數設定方式
前面TIP內所提到的,透過官方的Demo Sandbox可以查找到一些props的屬性名稱。舉例,以autoplay的自動輪播間隔時間(delay)來說,我們可以透過params的autoplay:{ delay:0 }來設定,也可以參考官方範例中的<swiper-container ... autoplay-delay="0" ... >來實現。
樣式的匯入
因為在使用Autoplay的時候,我們的目的是製作漸層間隔線。所以會希望在自動切換的時候間隔為0秒,且需要線性(linear)滾動。
在先前(Swiper Vue Component),可以直接在style內新增如下來調整(預設為ease-in-out):
...
<style>
  .swiper-wrapper {
    transition-timing-function: linear !important;
  }
</style>
但是在使用Swiper Element的方式時,這個做法沒有正確啟用。所以透過參數內的injectStyles,將屬性給匯入
<template>
    <swiper-container init="false"
    class="swiper-wrapper"
    :slides-per-view="1" :centered-slides="true" loop="true"
    ref="swiperInstance">
    ...
    </swiper-container>
</template>
<script setup>
  ...
  const params = {
    ...
    injectStyles: [
      `
        .swiper-wrapper {
            transition-timing-function: linear !important;
        }
      `,
    ],
  };
  ...
</script>